hello & welcome to the lovely world of 'Stampin' Up!' with me- Sally-Jo...i absolutely love - paper, scissors and glue......'ooooOOOoo' and not forgetting my addiction to rubber....well stamps, that is!!

I have choosen to become an Independent 'Stampin' Up!' Demonstrator, so I can get my hands on some of the hottest, on trend, quality craft goods and share my love of them, with you too!!

Book your free at home workshop, with a fantastic demonstration & a 'make & take' for all your guests- with the chance to earn FREE products and EXCLUSIVE hostess stamp set! email me at:
sally-johoughton@hotmail.co.uk for more information


Showing posts with label Jewellery Punch. Show all posts

Monday, 26 March 2012

All at once..........

Last week has gone in a blink!........ What with 'Creative Cafe', Matthews School Play ( I did end up watching all three shows!!) and helping Heather turn Foxglove into a 'Sport Relief' Red pony, on Friday (they raised just over £50!!)- my blog has been  neglected, sorry!

Thank you to all. who left comments, its been great to have some questions too, so before I go off onto something else, I will get those answered:

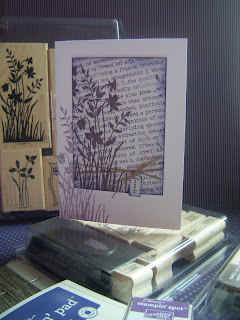
Allie my SU sister, left a lovely comment and also asked how I got the wreath shape- well I drew around my red sticky strip and cut out a 'scratch' paper mask, I then stuck it to the centre, with a little making tape folded round on its self, and stamped around the edge of the mask. It does take a little fiddling and I had, had the practise at Christmas, but if I can do it anyone can!

Kate. a fellow SU sister, also asked with her lovely comments, the finished size of card- it was 21 cm's or for those who are more traditional 8 inches, which can be made out of two sheets of A4 card stock.

Here is a picture. of one of my Christmas wreath cards. created in the same way- just with poinsettias, made with SU punches, and the lovely Christmas sentiment- from 'Delightful Dozen' stamped to the middle.

Now I couldn't just leave you with a lone Christmas picture, especially as the sun has been shinning like it thinks it's the middle of summer here!! So I will show you the boxes I decorated for Linda's 21st gifts, she is back home in the Isle of Man now, and she reported back a nice cam ferry crossing!!
My special gift was a 'Simply Adorned' necklace, which got a touch of 'Crochet Trim' & 'Seam Binding' and one of the gorgeous 'Trinket Keys'
I used the same supplies as the card, but with the sentiments from 'Your a Gem' &
'Tiny Tags' to create a custom tag for each box.
 Here shows the insert I made for the large-
'Simply Adorned Charm'.
Here are the boxes all lined up, ready to go in the gift bag. Linda was very excited, opening them all and placing them on the chain, it was great to give a special gift to a special person xx

If you would like to create a special gift like this,
then you can purchase all the goods through me, Sally-Jo! 
Contact me:
sally-johoughton@hotmail.co.uk

Don't forget....
SALE-A-BRATION ends on Saturday, and it would be a shame if you missed out on a fantastic FREE gift, with every £45 you spend! 


Monday, 20 February 2012

Baby love..........

Whilst in the stupor of my cold and colouring the 'Baby Tees' over last week, a little dust ball of a Layout idea, rolled into the fog of my head and has laid there fairly dormant till the free fall of fridays sugar rush!!

I have loads of pictures of my children, lots taken with haste and are hazy, out of focus shots with a thumb or finger peeping into shot, and loads of professional pictures that at the time seemed like a good idea and are now dated, but it doesn't mean they should be stuffed in a box, out of sight and mind, as they do bring back lovely memories...... well the ones that don't involve too much baby sick and sleepless nights!!

So here are my first attempts at bringing my babies, pictures, out of the dark......

This first layout is a picture of Heather that was taken at a Babystore, it's very different to the white backdrop photos that are so popular today, but popped on to a very white Layout and given a splash of colour with the 'Baby Tees' from the 'Stampin' Up!' Jumbo wheel, coloured with the SU markers in 'Regal Rose' and 'Pretty In Pink' and the blender pen.
My baby is 11 years old in March!!!
The journalling labels were stamped from 'Creative Elements',
In 'Crumb Cake'Ink.
I used the light, frond like swirl, from the same set,
to add interest to the bank 12x12 sheet and also....
Under the 'Doily Ribbon Lace' border and 'Baby Tees' images.

The second layout is of Matthew...... this shows him at about a couple of weeks old, and he was a big baby, he weighed in at 11lbs 4oz when he was born!! 
I had missed having his newbie baby shots at the hospital, as I had my baby and was home within 24hrs, and they only did them every other day, so these were taken at home, on our bed, with my old film camera. 
Again the layout has the same idea- a clean and simple background and a splash of colour with the 'Baby Tees', this time coloured in 'Marina Mist' and 'Bashful Blue'. 
I used the 'Doily Lace Ribbon' border punch again, I like how it makes a delicate addition.

And to add interest to the die cut wording, I ran it through the 'Big Shot' with the 'Perfect Polka Dots' Embossing folder. Mini tags were added with 'Tiny tags' and the co-ordinating 'Jewellery Tag' punch, and tied in place with the SU 'Linen Thread'.

I like how that even though the photos are so different, the layouts look similar, and they will make a nice double page spread in my album, but before then they will take pride of place, as samples of what you can create with the fantastic SU products, at the workshops I attend.

If you would like to host a Workshop and maybe earn some FREE goods, or you just want to find out more about 'Stampin' Up!' and the fanatsic craft products they offer, then contact me: 
sally-johoughton@hotmail.co.uk
or call 07891605129
xXXx

Saturday, 30 July 2011

In a bit of a 'Mist'!

Yesterday I had fun playing with a canvas kit a facebook friend had given me, to complete it, I had to add spray inks, when I received my starter kit there was a re-fill of the 'Marina Mist' SU ink, so I added a few drops to a mister and had a fantastic spray ink to match the 'Stampin' Up!' Ink pads......note to self, I need more ink refills to make more colour mists!

The canvas kit called for me to colour a doily with the spray ink, but my scrap paper was left with a delicate silhouette, and it inspired me to make this card.


The card base is made from 'Crumb Cake' SU card stock, cut to fit a DL envelope. The doily is one from my stash....hmmm she hoards doilies....well the local village 'Flower, Produce & Handicraft show' have a Children's doily colouring class, and my two love to enter this, so when I see nice doilies I pick them up.....believe me not all doilies are pretty!! Anyway here is a close up of the 'Marina Mist' sprayed over the doily.
I then created a collage of items to create a focal point, across the lower third of the card base. The band of corrugated card was salvaged from some packaging, and a strip was ripped to fit across the card.


I gathered a short piece of 'Old Olive' ribbon and stuck it to the right, of the band.


I stamped the rose frame from the 'Stampin' Up! Four Frames' stamp set, with chocolate chip ink, on to a scrap of 'Crumb Cake' card and punched it out using the coordinating punch, I then splattered it with 'Old olive' ink and stuck it, so it was peeping out from under the top left edge of the band.
I stamped 'Friend' and 'Love' from the 'Tiny Tags' SU stamp set, in 'Old Olive' ink, on to 'Crumb Cake' Card stock, they were then punched out using the 'Jewellery Tag' Punch. the 'Heart from the same stamp set was stamped with 'Chocolate Chip' Ink and punched out using the smallest heart from the 'Heart to Heart' punch. This was mounted with a small foam pad on to another jewellery tag. I knotted these on to a piece of linen thread that had been wrapped around the band.


Just peeking out from under the bottom right edge of the band, is the bird frame, stamped as the rose one, and on top of this is a flower made with the 'Flower Accent'. It was stamped in 'Old Olive' ink, on to 'Crumb Cake' card stock, this was trimmed out and stuck on top of the bird label with a foam pad, the large glass pebble is from my stash, I picked a whole bag of them up for a couple of pounds, they are the ones used for putting in the bottom of bowls of flowers!

Before sticking the collage band to the card base I added some splatters of the 'Old Olive' Ink.
As my SU mum Julie would say...'here is an arty farty angle' of the completed card!


Right! I am off to re-work this in to a

Lay out for a scrapbook page.....

while the urge to mist is upon me! xxx

Thursday, 14 July 2011

Colour Coached!!

Do you ever find you get stuck in a colour rut......you know.....the same ink pad colours always in use, or maybe you are afraid to mix things up a little??? Well the fantastic SU colour coach may be the thing for you, I never thought that I would use it, but I constantly have it on my desk and yes it's on hand, so that I have all the gorgeous 'Stampin' Up!' colours, without having sheets of card or ink pads all over, while I am going through my 'Will I- Won't I' stage of making!!


So I was making cards for some fellow Julies Jem's earlier this week, Happy birthday- Terri & also Catherine xx, and was once again drawn toward my 'Concord Crush' ink pad and I thought, what other colour could I pair with it for more of a monochromatic colour scheme......well yes the colour coach, even has a suggestion for this! It called a 'Dynamic Duo' and for 'Concord crush', It was paired with 'Perfect Plum' from the subtles collection, and 'My-o-my!' i do like this combo!


No prizes for guessing the stamp set, but it was on the desk, and well, I think the finished result looks pretty.....


yep! you guessed it 'Just believe' for the fronds

and this part was stamped in the 'perfect Plum'.


The text stamp in the background is the large friendly stamp.... it's big but don't be put off you can make it small too!!
The ink used for this was 'Concord Crush'.

Linen thread and a sentiment from 'Tiny tags' punched with the co-ordinating 'Jewellery tag' punch, created my own embellishment.


The inside was given the stamp treatment too, this time with just the 'perfect plum' ink.


And again on the envelope.
I do admit that I made the same card for both girls, but i really liked the first one and thought I would go with the flow!


I hope you like it too xx